Tag Archives: Raspberry

Cake Project I-White Chocolate Mango Mousse Entremet with Raspberry Jelly

13 Nov

I have been away from blogging for a few months now due to the summer season. Having said that it was an amazing summer. Vancouver hardly had any rain which on the other hand prompted forest fires in BC’s interior. Nonetheless it was gorgeous. Not having to work for a few months, I had time to rest up and involve myself in a few activities. Some of the activities included hiking at Quarry Rock with my church group, going to Emma Lea and Krause Berry Farms and the beach. I always enjoyed going to the farms during summer despite the long drive. It brings rest and peace to the soul. As well, this year had a bountiful harvest. My mom, friend and I went to Krause Berry Farms one week to pick blueberries and came home with buckets filled of large saucer like plump blueberries. We were amazed by the quality of them. It will definitely be a motivational factor to go again next year for blueberries. Unfortunately, nothing lasts for forever and now we are in the fall. October had just past with Halloween being the last hoorahhh. I had been busy also during the fall as well. I volunteered to make cakes for a few occasions which included a couple of birthday parties and a going a way surprise party for a church friend, J.Wee.

I quite enjoy making cakes for these events as it allows my creative side to show. Furthermore, there are not restrictions when making them. While it can be a bit time consuming, I had enjoyed making them immensely. Which brings be to the topic of this little story, White Chocolate Mango Mousse Entremet. Not entirely sure of what kind of cake the J. Wee liked, I had asked his house mates opinion. Mango it was. With this knowledge I set out to make the cake.

Assembly: To make the entremet, I first made the chiffon cake and baked it. While the cake was cooling, I proceeded to make the white chocolate mousse. The gelatin was soaked first in cold water for it to soften. Then the cream was whipped and set aside in the fridge. The sabayon was maded next. In a baine marie, I whisked the sugar and raw eggs to mildly warm and then beated it until light and fluffy. I then melted the white chocolate and folded it into the sabayon. With the gelatin softened, I heated it up to melt it and combined it with the chocolate mixture. When the mixture had cooled a bit, the mixture was then folded into the whip cream. Time was of the essence so fold fast. Once the mixture was thoroughly mixed, the mousse was poured into the cake and set the in fridge to set.

The jelly was the next step. First bloom the gelatin. Then puree the fresh raspberries and add sugar for tasting. Combine the gelatin and the puree and pour onto cake and let set.

The final step was the mango mousse. I decided to follow the mousse recipe from a pastry school I had gone to a few years back. To make the mousse, first soften the gelatin by placing it in cold water. Next whip the whipping cream and set aside in the fridge. Combine the mango puree and sugar for taste. Warm up the soften gelatin until it becomes a liquid and pour into the puree mixture. Finally, fold in the whipped cream and pour onto the cake and put into fridge to set.

Decoration:
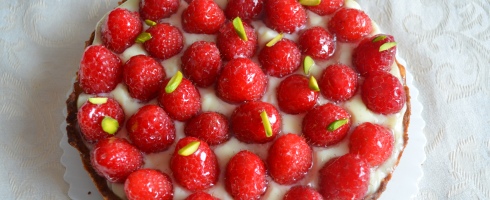
Mangoes were arranged in a flower like pattern and then whipped cream was pipped in the middle.

Voila!

Bavaroise Mango
160 ml Mango Puree
1 Lemon juice
60 g Sugar
5 g Gelatin (I used a gelatin sheet)
200 ml Cream

White Chocolate Mousse
200 g white chocolate
2 eggs
40 g sugar
4 g gelatin sheet
240 ml cream

Result: The cake was a hit and liked by member of the group members. The cake was light and sweet but no too sweet. The white chocolate mousse complimented the mango mousse and the raspberry jelly had a tangy sweetness that completed the cake. This recipe is a keeper.

~Happy Fall Baking~

Valentines-Raspberry Pistachio Frangipane Tart

18 Feb

It was Valentines this week. To make this week special, I decided to make something sweet for my friends and family. I recently bought 2 boxes of raspberries. Initially I was going to make a cheesecake but at the last minute I craved tart. Tart it is. I have not made frangipane for a while thus I decided to make a frangipane tart with pastry cream.

Tips:
1. For a stronger pistachio taste, toast the pistachios first
2. Pour the hot milk into the eggs not the other way around.

To make the tart, I first made the pate sucre. The frangipane came next. I wanted a roasted pistachio taste to the frangipane so I toasted some pistachios and gournd them till fine. A coffee grounder will do the trick. Butter was then measured and heated. Whipped cream, sugar and eggs where mixed in with the pistachios to form a semi paste and then the cooled butter was poured in. I baked the tart shell for approx 15 minutes first. When done, raspberry jam was spread over the bottom of the tart shell. The Pistachio frangipane was then poured into the tart shell and baked some more. ** I suppose I could blind bake the tart shell with the frangipane in it. But will leave it till next time I make it. Once the pistachio frangipane and tart shell is cooked. The pastry cream was next to come. Once the pastry cream was done. Set it to cool. Once cooled pour over the pistachio frangipane tart and garnish with raspberries. Voila!!!

dsc_0598

dsc_0600

Pistachio Frangipane

1 stick butter unsalted
1/2 cup cane sugar
1 cup ground pistachios
2 eggs
1/4 cup heavy cream

Creme Patiserrie
1 1/4 cups milk
1 egg
2 egg yolks
2 table cornstarch
1/4 cup sugar
1/2 vanilla bean

Pate Sucre

1 stick butter
2/3 cup icing sugar
1 vanilla bean
3 tablespoon ground almonds
1 pinch salt
1 egg
1 2/3 cup flour

Bon Appetit!!! Happy Valentines Day.

Christmas Cookie Project: Linzer Cookies

23 Dec

With 2 more days till Christmas, I decided to switch gears and make some cookies.  There are lots of cookies outside and I wanted to make some traditional cookies for Christmas.  This time I decided to make some Linzer cookies.

To make the linzer cookies, I first toasted up some hazelnuts and grounded them.  I then creamed the butter and sugar.  Once the butter/sugar mixture was nice fluffy and incorporated, the eggs and vanilla were added.  Continue mixing and add the salt.  Next came the dry ingredients.  Add the cake flour, cinnamon, bread crumbs, baking powder and hazelnuts.   Mix and form ball with the dough and refrigerate for 30 minutes.  Roll out the dough and cut with cookie cutters.

dsc_0562

Bake at 350 for 8 to 10 minutes.  Spoon jam onto the cookies without the holes and coat with icing sugar on the cookies with holes.

DSC_0563.JPG

DSC_0564.JPG

dsc_0565

Linzer Cookie Ingredients  (Culinary Institute of America)

3 sticks unsalted butter

1 1/4 cups sugar

1/4 tsp vanilla extract

pinch salt

2 eggs

3 cups cake flour

2 1/2 tsp ground cinnamon

2 cups bread crumbs

2 1/2 cups hazelnuts

Confectioner’s sugar for coating

Raspberry jam for filling

Result:  These cookies were light and crispy.  Delicious and beautiful.  Perfect for gift giving.

Happy Holidays!!!

Citron and Raspberry Mousse Cheesecake

5 Mar

I am back at making sweets again but I am also considering posting some savories on the blog as well. What is the reason you might ask? Well for one I don’t want to pass on an impression that sweets are my only diet. Nonetheless when I started this blog I began with the quest to master my baking and photography skills. Well needless to say, I think that I have come a long way in baking. My photography has improved as well as a few of my posts have graced the blogging community thankfully. Thus I am at an crossroads do I make more sweets? I really like baking and the creativity of it. When baking I am immersed in the world of flavours and colours and each creation is like peeling back a peel of onion revealing a bit more about the masterpiece. Each creation is on a journey with me through the years. I am grateful my blog has reached numerous parts of the world and the blogging community. Perhaps another blogging site for savories. Thank You All!!!!

Now to the main topic, I have been flipping through recipe books again. As I am Asian, I decided to make something with Asian influence or befitting the Asian palate. I bought a book titled Top Patissiers in Hong Kong. It is a pretty good book and the recipes are translated into english. Amongst those recipes I found a couple that I would like to try. The first project that I wanted to try is the Citron and Raspberry Mousse Cheesecake. Well… I am actually combining to recipes from two different HK chefs, nonetheless the flavours are same to the orginal recipe. The two chefs that inspired me was Titan Tsang and Tong Wong. What is so unique about this recipe is that it uses a lemon/lime curd to make the cheesecake.

To start off, I first made the dacquoise.
I then made the raspberry mousse
-measure the raspbery puree, sugar, cream cheese, whipped cream and gelatin
-soak the gelatin and warm up the puree
-add the sugar and gelatin in the puree
-mix the puree into the cream cheese
-fold in the whipped cream
To partially assemble, place the dacquoise disk into the bottom of the pan and pour in the mousse and set in the fridge.

The lemon curd mousse came next for the cheesecake.
-To make this curd, I measured the lemon and lime juice, sugar and eggs.
– boil the lemon juice and lime juice, take out heat, and mixed it on to the eggs and sugar.
-place back on heat and co cook to 85C stirring constantly and add the gelatin.
-Remove from heat and cool
-Mix the mixture with the cream cheese and fold in the whipped cream
-Pour on top of the raspberry layer

Voila!!!

DSC_0514

Citron Dacquoise
180 g egg White
90 g sugar
160 g ground Amond (toasted)
125 g icing sugar
30 g cake flour
20 g lemon zest

Citron Cheese Mousse
160 ml lemon juice
20 ml lime juice
40 g egg yolk
150 g sugar
300 g cream cheese
300 ml whipping cream
5 sheets of gelatin

Raspberry Cheese Mousse
100 g Raspberry Puree
50 g Sugar
150 g Cream Cheese
150 g Whipping Cream
6 g Gelatin

Result: This is a pretty cake as the pink raspberry mousse offsets the white lemon curd mousse. The cake has a pronounced flavor in lemon. Very tangy and perfect for lemon lovers.

Mille-feuille-Raspberry and Chocolate

7 Sep

What weather we been getting. Just finished a trip up to Kraus Berry Farms and must I say it was always a treat to go to a farm as the experience will never change. Being in the countyside, rest and peace is always aparant as many families go there to either relax, re-energize and admire the environment. For me it was an absolutely stunning enviroment; nothing an beat natures bounty, beautiful cloudless sky, fragrant flowers and berries. There were also tables with covering for the customers to sit in and snack on waffles, shakes while relaxing and socializing away.

Our rewards for this trip was blackberries, raspberries, strawberries and corn. Too take advantage of this good weather and berries, I made a Mille-Feuille. Mille-Feuille had always been partnered with custard between layers but in the recent years, there seems to be some variation to the traditional dessert. I had made mille feuille with custard before but this time, I decided to be more adventurous and walk dowm the same road that chefs walked down. This time I made the puff pastry but instead I made a white chocolate mousse and combined it with raspberries.

DSC_0529

Since the internet was with recipes on mille-feuille, I opted to leave the recipe out. Same goes for mousses. The mousse I had hear was white chocolate mousse. As for individuals who like to get tips on the pastry you can see it here. . While puff pastry can be a challenge to make since the pastry was quite finicky, pure joy in seeing it raise and layers make up the difference. As for me, I would be looking out for more recipes to try. Until then, I can be spotted out at the farms and relaxing with a Strawberry Milkshake.

Valentines Weekend Celebrations

16 Feb

Valentines certainly came and gone nonetheless the gentlemen delivered. I was shopping at Thomas Haas the other day; it was like a zoo in there. The beloved pastry and chocolate store attracted hundreds of loyal fans all eagerly waiting for mouth watering pastries and beautifully hand made chocolates. Chocolate lovers, husbands, boyfriends etc had already formed a s-like line in the store by the time I arrived. Everyone’s hand had boxes delicately shaped heart chocolates; momentos of love for each other while staff hurried around to fulfill their special day. Smiles were all around and the store smelled like rich chocolate. One whiff and I was drunk this to elixir. pastry

In downtown Vancouver, cold tin empty flower buckets that once housed dozens of gorgeously scently long stemmed roses lined the shelves red-roses-from-randy Someone’s heart was melted that evening when smelling fragrant sweet scent of the deep coloured vibrant red roses. What a special day this was.

To celebrate this special day, I made some tarts. I first started off with the pate sucre recipe. I made the crusts and fill them with 3 different toppings. In comparison to other crusts, pate sucre was quite versatile. The crust had a nice crunch and made a lovely addition to the fillings. The first tart was the lemon meringue tart. I decided to be adventurous and did a yuzu/meyer lemon filling. Yuzu added a zing to the filling and as for the meringue, I chose to make an italian meringue.

DSC_0322

The second tart contained a milk and white chocolate ganache while the third tart had a topping of fresh raspberries and pistachios.

DSC_0325

Felder was my go to chef when making a pate sucre recipe. I found his recipe was quite crispy and light sweet. The key to his recipe was the icing sugar. Felder substituted granulated sugar with icing sugar which in turn results in a lighter pastry.

Lemond Curd Filling (adapted from Anna Olson)

1 cup sugar

¼ cup cornstarch

1 cup water

6 large egg yolks ( I used 4 large egg yolks)

½ cup fresh lemon juice ( I substituted yuzo and meyer lemon juice)

2 tablespoons unsalted butter (I opted out)

I also added 2 teaspoons of lemon zest.

In the end I was quite delighted how the tarts turned out. They were very beautiful and definitely head turners. I think I could just sit there admire them and drool away; but as with anything fresh baked tarts go fast so here comes my fork and tea.

DSC_0332

DSC_0330

Bon Appetit everyone. Hope everyone enjoyed their special day!!!

Ramping Up for Valetines-Linzer Cookies

9 Feb

Valentines is just around the corner and the city was certainly ramping up for it. From little red streamers to hanging cupids and hearts to gorgeous long stem roses, stores were getting ready for the 1 day of the year where couples express their love for one another. Apart from Christmas holidays, Valentines was the next biggest day. The weather hopefully will hold up for these couples as they take a lovely stroll around vancouversunsetthe beach.

To ramp up for Valentines I decided to make some Linzer Cookies in the shape of Hearts. Boy did I make the right decision. The powdered white fully complimented the red gleaming jewel in the middle. As a suggestion, in order to make the jam middle more smooth, heat the jam up with the cookie and then place the top over them.

DSC_0307

Linzer Cookies (recipe found here)

Ingredients

3/4 cups butter (1 1/2 sticks), room temperature
1/2 cup sugar
1 egg
1/2 teaspoon lemon zest
1/4 teaspoon vanilla
1 1/2 cups finely ground blanched almonds or hazelnuts
2 1/4 cups cake flour (can sub all purpose flour)
1/2 teaspoon baking powder
1/2 teaspoon cinnamon
6 ounces raspberry jam, or other red preserve (I used quince jelly)
Powdered sugar

DSC_0312

These cookies are gorgeous and really create the atmosphere and mood for the occasion, Valentines!!!loula-pocoyo-valentine-card

Images of Fall, Festivities and Food

19 Oct

Fall is season full of colours stemming from golden yellows to vivid oranges and finally to stunning red. I always got a fiendish delight I visit Langley and its farms and nature. Admiration…doesn’t do much justice when it came to fresh air, food and nature. Because it was gobble gobble weekend, there were a number of festivities running. The Cranberry Festival would be one. Hundreds gathered in Fort Langley to see paddlers paddle down the Fraser River while others enjoyed a warm walk in the main hub, the festival. What was the theme of this festival? Well, kind of a no brainer since the title says it all. Up and down the main strip, one could see the little pinkish red berries show up everywhere. Yummmm..they were sweet.

I first hit Krause Berry Farms to bask in nature’s bounties….well…let the photographs show Fall in its finest form!!! 🙂

Photo-0142

Photo-0143

Photo-0145

Photo-0146

Photo-0148

The Long Weekend wasn’t complete without baking so here we go…..Molten Lava Cake. Enamored by its rich, dense and chocolatey texture, I itched and scratched until I finally succumbed to making the deliciously rich cake. A typical question may be, “Why did it take so long?” Answer: Family not chocoholics. The molten lava cake in actuality is slightly under baked thus the oozing batter. While attending pastry school, we were taught an alternative method. Instead of underbaking the cake, a truffle was inserted into the cake. Emphasis was placed on leaving the batter overnight for the flavour to mature.

To make the cake, I first measured the ingredients and then whipped up the sugar and eggs until very light in colour. Next I melted the dark chocolate and butter together and then folded the chocolate mixture into the egg/sugar mixture. The final step was folding in the sifted flour. Leave overnight and spoon the batter into ramkins the next day. Bake at 360F for 15 mins.

Photo-0160

Photo-0149

Note: The cakes will puff up during baking but will come back down when cooled. For decoration, a scoop of raspberry and strawberry sorbet was placed on top of the cake. Pistachios were also used as garnish. Serve Warm.

Photo-0154

There were virtually lots of recipes found on the internet. These were the ingredients I used to make mine.

Molten Lava Cake
Eggs
Sugar
Dark Chocolate
Butter
Flour

Happy Fall Baking.

Delicious Sorbets: Raspberry, Strawberry and Mango

28 Aug

As an ice cream conniseur that I am, one could see me 1st in the line ups at ice cream boutiques, wide eyed and longingly looking at flavours, on a hot summer day. My favorite was italian gelato. There would be smiles everywhere. Up and down the street, individuals would be licking their gobs of ice cold refreshing treat in the sweltering heat. Big surprise when I took an ice cream course. I was amaze at what one could do when making ice cream; there was virtually limitless combinations. The highlight was making an ice cream cake and bombe.

With the wonderfully warm sunny we have been receiving, albeit the rain today :(, it was the optimal time for ripe berries and better yet ICE CREAM 🙂 With the strawberries I chose at Krause Berry Farms and raspberries in the fridge, I took a chance at making Sorbet.

DSC_0113

Keys in making Sorbet:
-Make sure the fruit is ripe for better quality and taste
-Make sure to place the drum into the freezer for at least 24 hours
-Sugar content 1:1 ratio of sugar and water
-Alcohol improves the flavour and reduces the freezing temperature

Because I love both strawberry and raspberry, I combined the two fruits together to make the 1st sorbet. Wow the fresh strawberries were exquisite and aromatic. One could tell they were ripe as they produce a very sweet fragrance. The strawberries were first to be pureed and the raspberries came next. Sugar and water were measured and a simple syrup was created. Once cooled, I combined it with the pureed fruit and poured it into the ice cream machine to make sorbet. Giddy as a kindergarten, I was excited to see the syrup slowing thickening and becoming sorbet. Imagine my ecstasy when the I scooped out globs of the frozen treat. Next came the Mango Sorbet. Basically it was the same process as making the strawberry and raspberry sorbet. A tear may have rolled run my happy face when I saw the delicious golden yellow syrup thicken and form as Mango Sorbet was one of my favorites. Now I have two tubs of sorbet and more to come.

DSC_0128

Sorbet

500 ml Stock Syrup (1:1 ratio, sugar and water)
500 ml Fruit Puree
5 ml Lemon Juice

This was a basic recipe to use but guess what sometimes simpler is better. Enjoy your sorbet making days.

Lovely Long Weekend and Truffles

5 Aug

DSC_0043

DSC_0074

DSC_0063

DSC_0075

Photo-0042<a

Photo-0044

Photo-0039

Photo-0041

As one could see I had an amazing long weekend filled with festivities. Normally I would write about it but as they say, a pictures worth a thousand words.
To top it off, I made chocolates again. Being enamored with chocolate from the very beginning. I always sought out ways to better improve myself thus I decided to toast the nuts and sesame seeds for a even better pronounced flavor. I also grounded up some freeze dried berries as well. The ganache was white chocolate rolled with an assorted of nuts and berries. What did I get? A colourful flavourful array of white chocolate truffles. Yum. 🙂

DSC_0080

DSC_0172

Ganache:
White Chocolate
Cream
Butter
Toppings: Black Sesame, Almond, Coconut, Pistachio, Strawberry and Raspberry.

Looking forward to the rest of this long weekend.

La pâtisserie de mes envies

Vous faire partager ma passion ...

Butter Baking

A blog of baked goods, custom cakes and desserts

Jo the tart queen

food, travel & photography

NOW, FORAGER

Teresa Floyd Food & Photography

Hello Sweet Dessert

baking . cooking . et al

Jay Voclain - A sweet story

A Young pastry chef who aspires for more, decides to push her luck by moving to Los Angeles and starts her own company.

GretaCooks

Life is short. Eat well.

Mon Voyage Culinaire

Nana's Culinary Journey

The Curious Baker

Gluten Free . Seasonal Recipes . Alternative Flours . Interesting Combinations

thebountifulplate

learn.savour.laugh

Cooking Without Limits

Food Photography & Recipes

My husband cooks

A tasty look at the food he makes, and I eat

fête

adventures in food, travel, and photography

Liege Waffle Recipe / Gaufre de Liège Recette Blog

Liege Waffle Recipe / Gaufre de Liège Recette

Bicil The Baker

Sugar.High.

My kitchen of love ~

What's behind my kitchen door

100 Days Of Evelyn

Dessert recipes, tutorials and photography